Magento Salesforce Integration
Salesforce is a customer relationship management that connects a variety of businesses and their customers. Salesforce CRM is the place where every business can

Salesforce is a customer relationship management that connects a variety of businesses and their customers. Salesforce CRM is the place where every business can
Salesforce is a customer relationship management that connects a variety of businesses and their customers. Salesforce CRM is the place where every business can synchronize their customer experience. Considering an example of online shopping, it could be a customer placing an order on your webstore which is synced with Salesforce. Salesforce also has the ability to keep everything updated (Salesforce records) so that customers have a real time experience.
How to use it?
Having brief information about Salesforce, let's look at how you can use it for both Magento development services and your business needs. Let's take it one step at a time to see what needs to be done:
- Firstly, all of your company or organization needs to have a Salesforce account.
- Once a Salesforce account is being set up, you are provided with some secret information such as client ID, client secret and refresh token. This secret information is used by Salesforce to authenticate each and every request made by your application.
- Before making any request to Salesforce, you need to get a bearer token from their server using the provided secret information.
- Once you get a bearer token, you can make any request to Salesforce servers by passing this bearer token in the request header.
The process shown above is a generic approach that can be used regardless of the language in which your application is programmed.
To demonstrate data synchronisation with Salesforce, this article will use a PHP-based Magento ecommerce platform. A simple example will show how orders can be synchronized in Magento development services with Salesforce. So let's get started.
Demonstration
Here are the steps that need to be followed:
- Create a basic structure of the custom module
- Create a form template with the required fields
- Integrate form into cart page
- Make a request to the Salesforce server to push order information.
- Deployment and Testing
Create basic structure of the custom module
- Goto magento app → code directory
- Create a directory and name it as SJInnovation (Sjinnovation is vendor name)
- Navigate to app → code → Sjinnovation directory
- Create a directory and name it as SalesforceIntegration (SalesforceIntegration is the module name)
- Create registration.php in app → code → Sjinnovation → SalesforceIntegration directory and add the following code
<?php \\Magento\\Framework\\Component\\ComponentRegistrar::register(
\\Magento\\Framework\\Component\\ComponentRegistrar::MODULE,
'Sjinnovation_SalesforceIntegration',
__DIR__
);
?>
- Create etc directory in SalesforceIntegration directory
- Create module.xml file in SalesforceIntegration → etc directory with the following code
<?xml version="1.0"?>
<config xmlns:xsi="http://www.w3.org/2001/XMLSchema-instance" xsi:noNamespaceSchemaLocation="urn:magento:framework:Module/etc/module.xsd">
<module name="Sjinnovation_SalesforceIntegration" setup_version="1.0.0">
</module>
</config>
- We are done with the skeleton of the basic custom module. Let’s upgrade the setup. To do so, fire the below commands
- php bin/magento setup:upgrade
- php bin/magento cache:clean
You can always check the status of the module using the following command
php bin/magento module:status Sjinnovation_SalesforceIntegration
Resulting directory structure of the module is as shown below
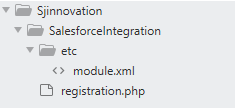
Create a form template with the required fields
- Create a directory structure as shown below
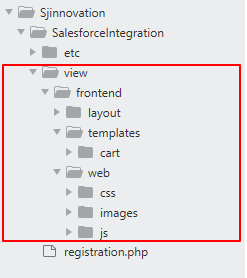
- Create a new file with the following code in the cart directory and save it as additional-user-details.phtml
<div id="myModal" class="modal">
<div class="modal-content">
<span class="close">×</span>
<form>