Master the Art of Drupal CI/CD with AWS and GitLab: Automate, Accelerate, and Excel!
Ready to go on an exciting journey where we will explore the power of Drupal CI/CD using AWS and GitLab? In this blog, we will delve into the process of setting

Ready to go on an exciting journey where we will explore the power of Drupal CI/CD using AWS and GitLab? In this blog, we will delve into the process of setting
Ready to go on an exciting journey where we will explore the power of Drupal CI/CD using AWS and GitLab? In this blog, we will delve into the process of setting up a CI/CD pipeline to deploy different repositories of a Drupal app on AWS EC2 instances using various AWS services such as CodeBuild, S3, CodeDeploy, API Gateway, Lambda, and more, all orchestrated through GitLab. You will know everything about Gitlab CI CD with AWS. Following this Drupal CI CD with AWS and Gitlab tutorial will make it easier to deploy our Drupal app to production, development, and staging environments easily and with precision.
So without further ado, let’s go explore Drupal CI CD with AWS and Gitlab example!
Implementation
Architecture Diagram for the Project
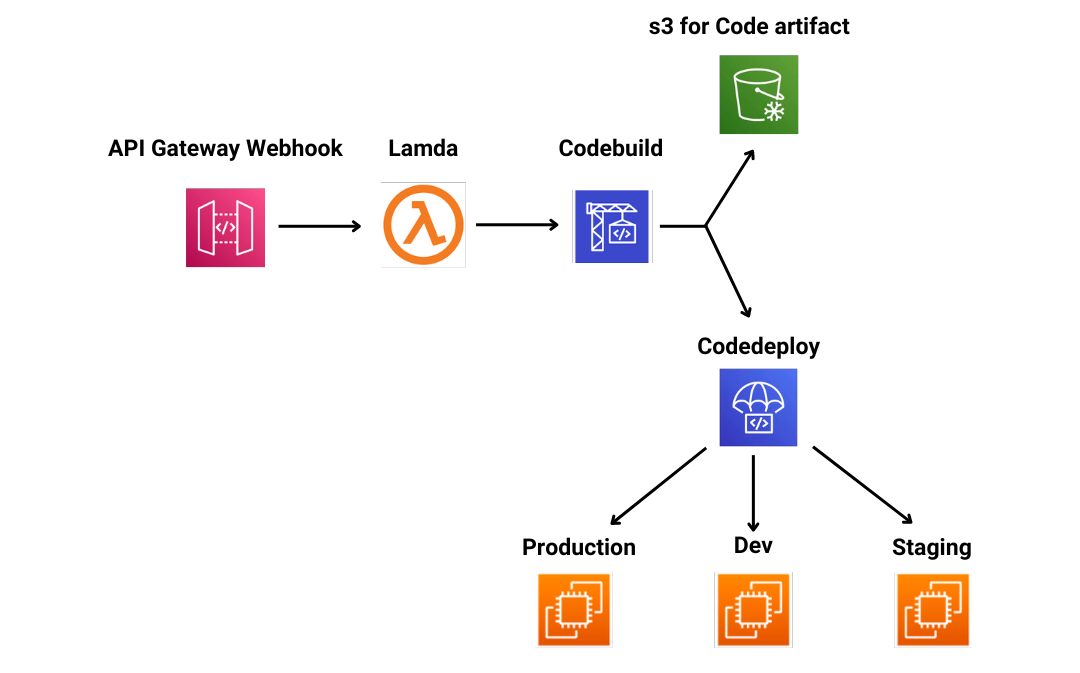
Gitlab has become a popular platform for software developers, and many companies are using it to host their code repositories.
- However, it is not supported by AWS Codebuild, which is used to build and deploy applications on AWS, which was a challenge for us since we needed to deploy three different repositories to three different EC2 instances (dev, prod and staging) with code from three different branches (dev, prod and staging). To solve this challenge, we used webhooks and nine different deployment groups.
Each deployment group had a branch from a repository as a trigger, and the deployment group was named according to the repository name and branch name ( {repository name} + {branch name}). We then used three different types of deployment groups (dev, prod and stage) to deploy the code to the respective EC2 environment. The webhook we used was an API Gateway which triggered a Lambda function.
The Lambda function then triggered CodeBuild, which got the repository URL, access token of the repo for cloning and the branch name so that the specific CodeDeploy agent could be triggered. Using this approach, we were able to successfully deploy our code to the respective EC2 instances and branches. This was a great example of how webhooks can be used to connect different services.
How to Add webhook to the repository in Gitlab?
Wondering how to add webhook to the repository in Gitlab? Well, before adding a webhook you need to have an API, which we need to create in the AWS API gateway.
To create an API gateway and add Lambda as a target:
Let’s check out how to create an API gateway and add Lambda as a target example:
- Log in to your Amazon Web Services (AWS) account.
- Go to the AWS Management Console and select the API Gateway service.
- Click the Create API button.
- Enter a name for your API and select the regional endpoint (if available).
- Click Create API
- Select Create Resource from the Actions menu
- Enter a Resource Name and select the HTTP verb (e.g. POST) and click Create Resource
- Select the Method Request tab and check the box next to the POST verb
- Select the Integration Request tab and select the integration type as Lambda Function
- Enter the name of the Lambda function you want to use for this API endpoint
- Select the Method Response tab and check the box next to the POST verb
- Select the Integration Response tab and select the integration type as Lambda Function
- Enter the name of the Lambda function you want to use for this API endpoint
- Select the Deploy API tab
- Select a Deployment Stage and click Deploy
- Copy the api url from the api dashboard
To add the webhook to the repository:
Now, let’s move to how to add webhook to the repository in Github:
- Log in to your GitLab account
- Click on the “Settings” tab of your project
- Select the “Integrations” section
- Scroll down to the “Webhooks” section and click the “Add Webhook” button
- Enter the URL copied from api gateway .
- Select the events that you want to receive notifications for, such as “Push Events” or “Merge Request Events”. In our case it will be push event
- Click the “Add Webhook” button.
- Click the “Test” button to test the webhook
- If the test is successful, you will receive a success message.
You need to add the webhook for all the (3) repositories in use.
Once this is done , we need to now add code in the lambda so that lambda dynamically passes environment variables to the codebuild and invokes the same
Note that environment variables passed here will depend on which repository on which branch has been pushed.
Environment variables that lambda function will pass to the codebuild are:
- GitLab repository url:For cloning
- Git lab access token: Note that the repo we used isusing 2 factor auth
So for 2 factor access , we have to use access token, if no 2 factor is used then only password and user name is enough. - Repo name
- Environment name: Will depend on the branch name which has been pushed (dev ,stage ,main/prod)
The repo clone url , repo name and environment name will be available in the post request made to the webhook(api gateway ) , that means our lambda can access the information from the invocation event.
Lambda code :
codebuild = boto3.client('codebuild')
codebuild.start_build(
projectName=projectName,
environmentVariablesOverride=[{
'name': 'COMMAND',
'value': command,
'type': 'PLAINTEXT'
},
{
'name': 'REPO',
&n