Easy Steps to Create a Patch in Drupal
Looking to understand how to create patches in Drupal? One useful resource for understanding this process is the GitHub apply patch feature. By utilizing this tool, you can easily apply patches to your Drupal codebase, including how to add a patch in Drupal 9, and streamline your development workflow. Whether you're a seasoned Drupal developer or just starting out, mastering GitHub apply patch can be a valuable skill to add to your arsenal.
If you're looking for more information on how to apply a git patch and how do I create a new patch file, in this blog, we are going to uncover two main questions:
Check this video to Install Drupal in 5 minutes!
So, let’s get started.
What is a Patch?
A patch is a file that consists of a list of differences and is usually created with the help of the git diff command, often a part of Drupal patch creation. In the Drupal community, developers create Drupal patch files as contributions to fix issues or enhance features in a module, theme, or Drupal core.
However, before you can contribute a patch to Drupal, you need to understand how Drupal patches work and create a pull request using GitHub. This process involves forking the repository, creating a new branch, committing your changes, and then opening a pull request to have your changes reviewed and potentially merged. Our UAT Tester and QA team will then review your changes to ensure that they meet the requirements of your Drupal web development service. Once your pull request is approved, the patch can be applied to the appropriate codebase using the GitHub apply patch feature.
How to Create a Patch in Drupal?
Here, we will show you the Drupal patch steps for patch making in Drupal, how to apply git patch, and the ways of creating a simple Drupal patch file:
There are 2 different ways of creating a patch file
- Path Independent
- Path Dependent
Path Independent Patch
Follow these steps to create a Path Independent Patch using GitHub apply patch for a quick Drupal patch guide:
1. Create and set up a repository on GitHub specifically for Drupal development patch files. It is best to maintain a single git repository for the Drupal contribute patch files that you will be applying to your Drupal project.
2. Move the module/theme or core files that you need to generate patches to the newly created git repository.
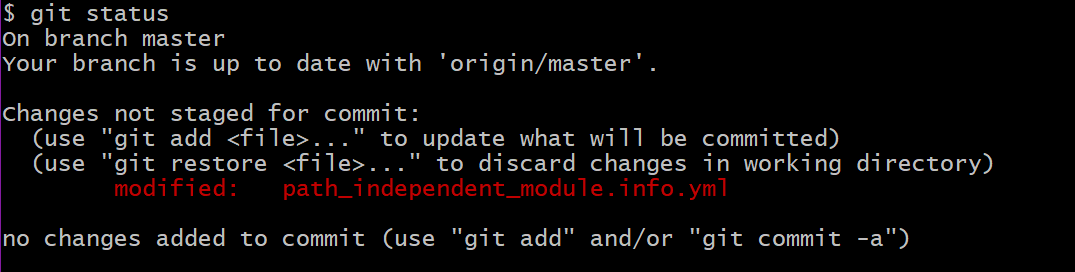
3. Make the necessary changes to a file on your local.

4. Verify that the “git status” command shows the file that you have modified.
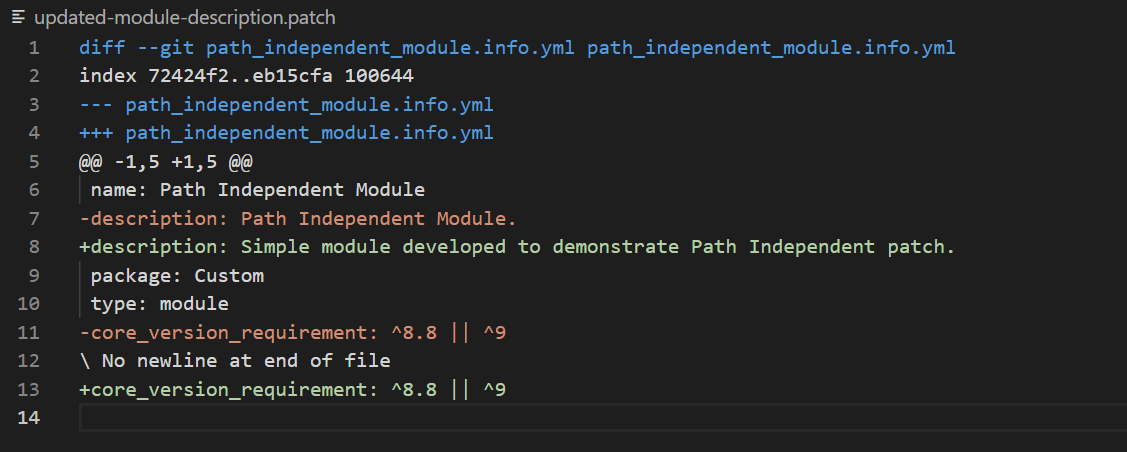
5. To generate the patch, use the following command:
git diff --no-prefix [file-name] > ./file-name.patch
6. The above command will generate a path-independent patch with the mentioned patch filename.
Example:
git diff --no-prefix path_independent_module.info.yml > ./updated-module-description.patch
will generate the below file:
7. You can then use the independent patch file and apply it to the appropriate module(s).
By following these steps from our Quick and simple Drupal patch tutorial, you will understand the Drupal module patch creation process and learn how to apply git patch to your Drupal project easily and effectively.
Path Dependent Patch
Follow these steps to create a Path Independent Patch using GitHub apply patch:
1. Creating a custom patch in Drupal CMS begins with setting up a repository on GitHub specifically for patch files, adhering to the best practices for patching in Drupal development. Maintain a single git repository for the patches you'll apply to your Drupal project.
2. To generate patches, move the module/theme or core files that need changes to this new git repository using GitHub apply patch.
3. Once you've done that, make the necessary changes to a file on your local. This will enable you to use GitHub apply patch to apply those changes to the repository and generate patches for your project.
4. Verify that the “git status” command shows the file that you have modified.
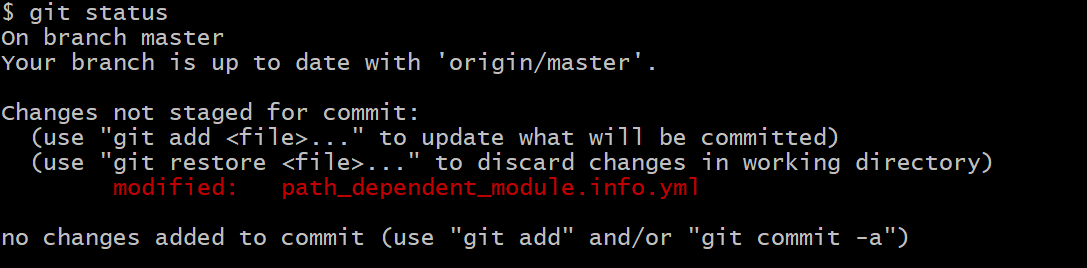
5. To generate the patch use the following command:
git diff [file-name] > ./file-name.patch
6. The above command will generate a path-independent patch with the mentioned patch filename.
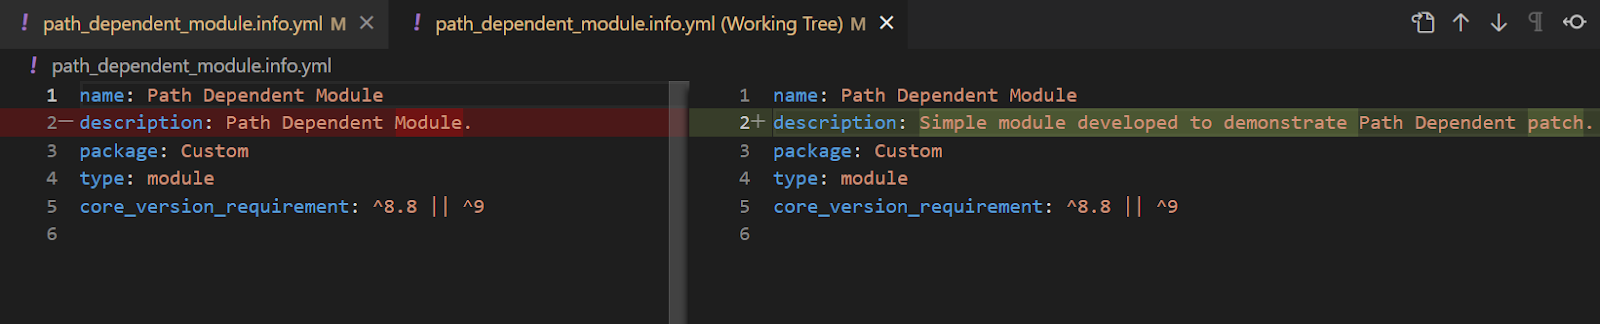
Example: git diff path_dependent_module.info.yml > ./updated-dependent-module-description.patch
will generate the below file:
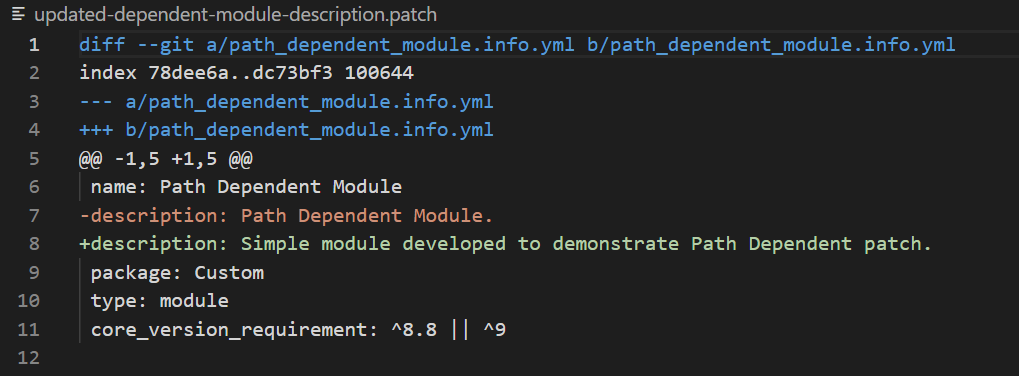
7. If you're wondering how to apply git patch, you can then use the dependent patch file and apply it to the appropriate module(s) and make sure that the file path mentioned in the git differences is the same as in your project.
Note: Path Independent patch can be used as a best practice to create a patch since the git difference does not show the exact file location and it is not required that the original file should have the same location as the path given by git diff. If you want to learn how to apply git patch using GitHub, you can use the GitHub apply patch feature to easily apply the changes to your repository.
Best Practices for Testing and Verifying Your Patch Before Submission
When it comes to creating and submitting patches, testing and verifying the patch is an essential step in ensuring that it works as intended and doesn't introduce any new issues. Follow this step-by-step guide for Drupal patch creation and utilize these best practices for testing and verifying your GitHub apply patch before submission:
Test the patch on multiple environments: How to create a patch in Drupal easily involves testing it on various versions of Drupal, OS, or browsers. It's also key for easy Drupal patch making for beginners to understand how to apply git patch to adjust code and reapply patches as necessary.
Use automated testing tools: Tools like PHPUnit, Behat, and SimpleTest are efficient for catching issues in your Drupal module or theme, making the process less intimidating for those new to patching. Automate the test process with GitHub apply patch to confirm patch functionality.
Check for conflicts with other modules or themes: When testing your patch, ensure no conflicts with other modules or themes from the Drupal software fix, a key part of version control system practices like Git for Drupal development.
Watch this video to install and uninstall Drupal modules with minimal disruption
Verify the patch's functionality: Confirm that your GitHub apply patch conforms to Drupal community guidelines and addresses the right issues, including Drupal security patches, without bringing up new problems.
Document the testing process: To aid other module maintainers and support open-source contribution, recording the testing steps when applying patches in Drupal can clarify the rationale behind changes and uncover testing-phase issues.
These practices ensure your patch is ready for submission, streamlining the Drupal module development and contribution cycle, and setting a standard for high-quality Drupal web development service.
FAQs:
1. How to Create a Patch in Drupal?
Get the original project: Clone the repository of the Drupal project or module you want to modify.
Make your changes: Edit the code in your local environment to implement the desired changes.
Create the patch: Use the command-line tool diff or git to compare your changes against the original code and generate a patch. Be descriptive in the file name so others can understand the purpose of the patch.
Test the patch: Apply your patch to a fresh copy of the original project to ensure it works as expected. Submit the patch: If you’re contributing to the Drupal community, upload the patch file to the appropriate issue queue on Drupal.org for review.
2. How to Patch a Module in Drupal?
Locate the patch: Find the patch file you wish to apply, typically within an issue queue on Drupal.org.
Apply the patch: Place the patch file in the root directory of your Drupal installation or the directory containing the module.
Clear the cache: After patching the module, clear Drupal's cache to ensure the changes are recognized. This can be done within the Drupal admin interface or via Drush using drush cache-rebuild.
Test the changes: Verify the module functions as expected after applying the patch.
3. How do I Create a New Patch File?
Start with the original source code as your base. Make your changes or improvements. From the command line, navigate to the top directory of your source code. Use the diff command to create your patch file. Remember to include documentation in your patch submission to explain what the patch does and why it is needed.
So there you have it. If you're wondering how to apply git patch to your Drupal module for your Drupal web development service, be sure to follow these steps when creating a Drupal module. Another helpful tip is to use GitHub apply patch to streamline the process and make it even easier for you to manage patches and contributions to your codebase, especially when providing Drupal web development services to your clients.

DRUPAL: The CMS you must be looking for!

Culture & happiness in SJI