Beginner’s Guide: Get Started with Angular With Counter App And TailwindCSS

Angular is a popular open-source front end framework that is widely used for building dynamic and scalable web applications. It is developed and maintained by Google and has a large community of developers who contribute to its growth and evolution.
TailwindCSS, on the other hand, is a utility-first CSS framework that makes it easy for developers to create customizable designs with minimal effort. If you're looking for an Angular Tailwindcss tutorial and to get started with Angular along with Counter App and TailwindCSS, this blog will give an in-depth introduction to the framework and guide you through the process of setting up a new project.
Why Angular?

The first aspect you need to know in this Angular tutorial for beginners with TailwindCSS and Counter App is what is Angular!
Angular is among the favorite front end web application frameworks used by developers today. There are many advantages of using Angular over other front-end frameworks. That’s the reason why it has gained such recognition and is so popular. Here are some of the most notable benefits of using Angular for web application development:
Modular Structure: First off, Angular follows a modular structure. Since the Angular modular structure uses a component-based architecture, it becomes easy to manage and maintain large-scale applications.
- Components are self-contained modules that can be easily reused across your application.
- So developers can create a library of components that can be used across various projects, minimizing development time and increasing consistency across applications.
Two-Way Data Binding: Angular offers two-way data binding, which automatically updates the model and view when either is changed. There are many benefits of two-way data binding in Angular. Developers do not have to write a lot of code to manually update the view when the model changes or vice versa. This makes it easier to develop and debug your applications.
Reusable Components: You may be wondering, “Reusable components in Angular: How they help in building scalable web applications?” Angular provides an extensive range of Angular reusable components, such as forms, buttons, and navigation menus, which can be easily integrated into your applications. These components are built by the Angular team and are thoroughly tested to ensure compatibility and consistency across different browsers and devices. There are many benefits of reusable components in Angular. These components help reduce development time and increase consistency across your applications.
Strong Community: There are advantages of being part of the Angular community. The Angular community is thriving and active place for developers who are constantly contributing to the framework and building new tools and resources to make development easier. You can find many resources, such as tutorials, documentation, and support, making it fuss-free for developers to learn and use Angular effectively.
Getting Started with Angular

Now let’s talk about setting up a new Angular project with the Angular CLI in this beginner's guide to Angular with TailwindCSS. The first aspect to setting up an Angular project from scratch is that you'll need to create a new project. There are several ways to setting up an Angular project, including using the Angular CLI or installing Angular manually. You can get in touch with our experts to get a step-by-step guide to set up a new Angular project. Our team can also tell you the differences between using Angular CLI and installing Angular manually. In this blog, we'll focus on using the Angular CLI, which is the recommended approach for getting started with Angular.
Step 1: Install the Angular CLI
The Angular CLI is a command-line tool that makes it easy to create, build, and deploy Angular applications. To install it, you'll need to have Node.js and npm (Node Package Manager) installed on your machine. If you don't already have these tools installed, you can download them from the official Node.js website. (https://nodejs.org/en/download/)
Once you have Node.js and npm installed, you can install the Angular CLI by running the following command in your terminal:
npm install -g @angular/cli

Step 2: Create a New Angular Project
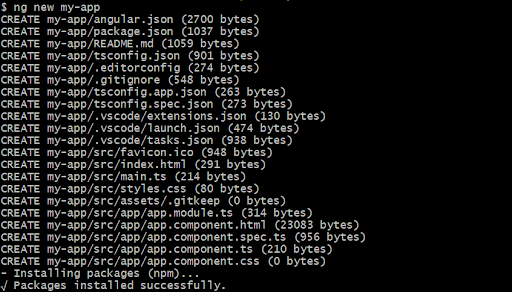
Now, we move to how to create a new Angular project with Angular CLI. With the Angular CLI installed, creating a new project with Angular CLI becomes easy. You need to run the following command in your terminal:
``ng new my-app``
This will create a new directory called my-app that contains your new Angular project. You can replace my-app with the name of your project if you prefer.
Step 3: Serve the Application
Now let’s check out How to serve an Angular application using the Angular CLI.
To know how to serve the application with Angular CLI, navigate to the my-app directory and run the following command:
ng serve
This will start a development server and serve your application at http://localhost:4200/. You can view your application in a web browser by visiting this URL.

Step 4: Let’s Start Building the Application
With your Angular project set up and served, we can start building the Angular application. The my-app directory contains all of the files and directories for your project, including your component files, services, and other assets. You can edit these files to add functionality and change the appearance of your application.
Step 5 : Installing Tailwind CSS
Tailwind CSS is a popular utility-first CSS framework that provides a set of pre-designed CSS classes to help developers quickly style their web applications. Here is a what you need to know about installing Tailwind CSS in an Angular project: Step-by-step guide.
Run the below commands:-
npm install -D tailwindcss postcss autoprefixer

npx tailwindcss init

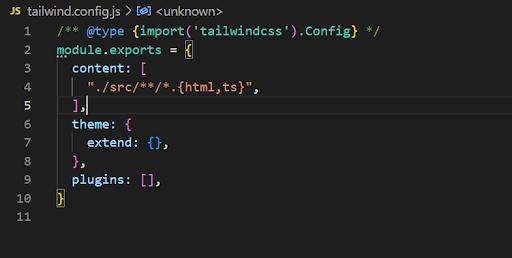
A filed named tailwind.config.js will be created in the root directory .
content: [
"./src/**/*.{html,ts}",
],
Input the line `` "./src/**/*.{html,ts}", ` as shown Below
Then
Add the Tailwind directives to your CSS
Add the @tailwind directives for each of Tailwind’s layers to your ./src/styles.css file.
@tailwind base;
@tailwind components;
@tailwind utilities;
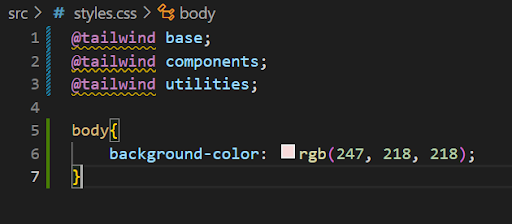
Once done we can start building our counter Component .
Step 6 : Adding Counter Component
To make a counter component run the ``ng generate component counter`` command in terminal .
Once that is done a new folder will be created named counter under the src/app directory .
Here the html , css and Typescript file of the component is generated .
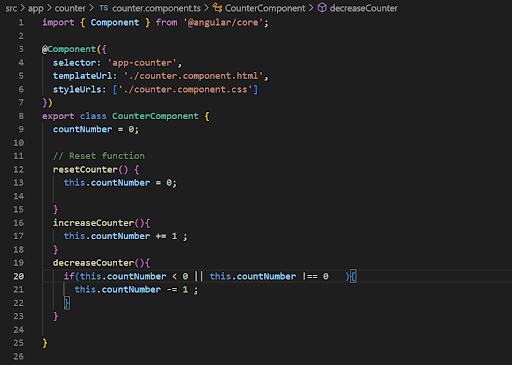
Go to the counter.component.ts file and we will add the Increment , Decrement and the Reset function for the counter .
Then in the counter.component.html file we will make the html with tailwind classes .
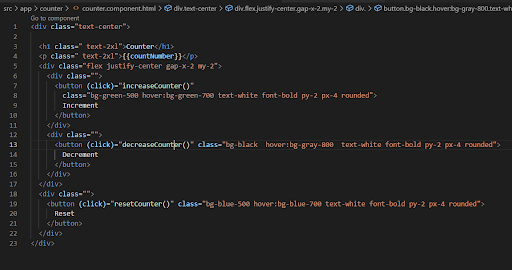
And our Application is ready
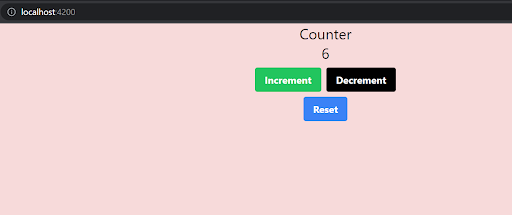
Save it and Now Go to http://localhost:4200 in the browser to see the output
Conclusion
This blog provides a comprehensive introduction to getting started with Angular. By using the Angular CLI, you can quickly and easily set up a new project and start building dynamic and scalable web applications. With a strong community of developers and a wide range of resources and tools available, Angular is a great choice for anyone looking to build front-end applications.
We hope that this Beginner's Guide to Angular with TailwindCSS has given you a good understanding of Angular and TailwindCSS and inspired you to start building your own web applications using these powerful tools.
If you want to curate user-centric and visually stunning front-end designs that amaze your customers, then visit our Front-end Development Services page.
Happy coding!

Developing Leadership Skills and Taking Accountability: How-to Guide

Experience of Organizing Hackathons at SJInnovation


