Master the Art of Drupal CI/CD with AWS and GitLab: Automate, Accelerate, and Excel!

Ready to go on an exciting journey where we will explore the power of Drupal CI/CD using AWS and GitLab? In this blog, we will delve into the process of setting up a CI/CD pipeline to deploy different repositories of a Drupal app on AWS EC2 instances using various AWS services such as CodeBuild, S3, CodeDeploy, API Gateway, Lambda, and more, all orchestrated through GitLab. You will know everything about Gitlab CI CD with AWS. Following this Drupal CI CD with AWS and Gitlab tutorial will make it easier to deploy our Drupal app to production, development, and staging environments easily and with precision.
So without further ado, let’s go explore Drupal CI CD with AWS and Gitlab example!
Implementation
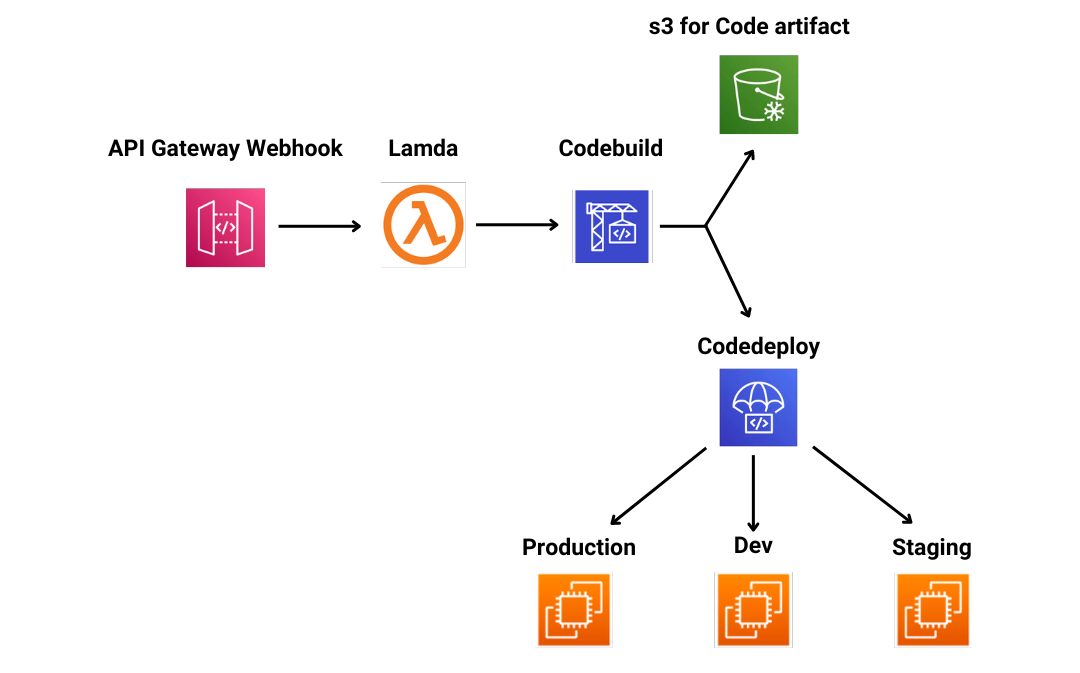
Architecture Diagram for the Project

Gitlab has become a popular platform for software developers, and many companies are using it to host their code repositories.
- However, it is not supported by AWS Codebuild, which is used to build and deploy applications on AWS, which was a challenge for us since we needed to deploy three different repositories to three different EC2 instances (dev, prod and staging) with code from three different branches (dev, prod and staging). To solve this challenge, we used webhooks and nine different deployment groups.
Each deployment group had a branch from a repository as a trigger, and the deployment group was named according to the repository name and branch name ( {repository name} + {branch name}). We then used three different types of deployment groups (dev, prod and stage) to deploy the code to the respective EC2 environment. The webhook we used was an API Gateway which triggered a Lambda function.
The Lambda function then triggered CodeBuild, which got the repository URL, access token of the repo for cloning and the branch name so that the specific CodeDeploy agent could be triggered. Using this approach, we were able to successfully deploy our code to the respective EC2 instances and branches. This was a great example of how webhooks can be used to connect different services.
How to Add webhook to the repository in Gitlab?
Wondering how to add webhook to the repository in Gitlab? Well, before adding a webhook you need to have an API, which we need to create in the AWS API gateway.
To create an API gateway and add Lambda as a target:
Let’s check out how to create an API gateway and add Lambda as a target example:
- Log in to your Amazon Web Services (AWS) account.
- Go to the AWS Management Console and select the API Gateway service.
- Click the Create API button.
- Enter a name for your API and select the regional endpoint (if available).
- Click Create API
- Select Create Resource from the Actions menu
- Enter a Resource Name and select the HTTP verb (e.g. POST) and click Create Resource
- Select the Method Request tab and check the box next to the POST verb
- Select the Integration Request tab and select the integration type as Lambda Function
- Enter the name of the Lambda function you want to use for this API endpoint
- Select the Method Response tab and check the box next to the POST verb
- Select the Integration Response tab and select the integration type as Lambda Function
- Enter the name of the Lambda function you want to use for this API endpoint
- Select the Deploy API tab
- Select a Deployment Stage and click Deploy
- Copy the api url from the api dashboard
To add the webhook to the repository:
Now, let’s move to how to add webhook to the repository in Github:
- Log in to your GitLab account
- Click on the “Settings” tab of your project
- Select the “Integrations” section
- Scroll down to the “Webhooks” section and click the “Add Webhook” button
- Enter the URL copied from api gateway .
- Select the events that you want to receive notifications for, such as “Push Events” or “Merge Request Events”. In our case it will be push event
- Click the “Add Webhook” button.
- Click the “Test” button to test the webhook
- If the test is successful, you will receive a success message.
You need to add the webhook for all the (3) repositories in use.
Once this is done , we need to now add code in the lambda so that lambda dynamically passes environment variables to the codebuild and invokes the same
Note that environment variables passed here will depend on which repository on which branch has been pushed.
Environment variables that lambda function will pass to the codebuild are:
- GitLab repository url:For cloning
- Git lab access token: Note that the repo we used isusing 2 factor auth
So for 2 factor access , we have to use access token, if no 2 factor is used then only password and user name is enough. - Repo name
- Environment name: Will depend on the branch name which has been pushed (dev ,stage ,main/prod)
The repo clone url , repo name and environment name will be available in the post request made to the webhook(api gateway ) , that means our lambda can access the information from the invocation event.
Lambda code :
codebuild = boto3.client('codebuild')
codebuild.start_build(
projectName=projectName,
environmentVariablesOverride=[{
'name': 'COMMAND',
'value': command,
'type': 'PLAINTEXT'
},
{
'name': 'REPO',
'value': repo,
'type': 'PLAINTEXT'
},
{
'name': 'CLONE_URL',
'value': clone_url,
'type': 'PLAINTEXT'
},{
'name': 'DIRECTORY',
'value': directory,
'type': 'PLAINTEXT'
},{
'name': 'REMOTEBRANCH',
'value': Remote_Branch,
'type': 'PLAINTEXT'
},{
'name': 'PREFIX',
'value': key_prefix,
'type': 'PLAINTEXT'
}
],
)
Next step in the Drupal CI CD with AWS and Gitlab tutorial is to create a code build application and add bash commands:
- Log into the AWS Console and navigate to the CodeBuild service page.
- Click on the Create Build Project button.
- Provide a name for the project and select a source provider.
- Configure the source settings according to your requirements.
- Select the operating system and runtime environment.
- Create a build environment and specify the compute type and buildspec file.
Edit the buildspec for the application with these commands
version: 0.2
run-as: root
phases:
build:
commands:
- echo "on build"
- echo $GITLAB_PASSWORD
- git clone -b $REMOTEBRANCH --single-branch `echo $CLONE_URL`
- ls
- cd ${DIRECTORY} && eval ${COMMAND}
Here the command passed in the env for codebuild is bash build.sh
Where build.sh is a file in the ci-scripts folder of the repo, that contains bash commands to upload artifact and trigger repo-env specific codedeploy deployment group for the last phase of deployment
Its important to keep the file in of all the repositories
Build.sh
#!/bin/bash
export HOME=/root
echo "drupal deployment"
ls
aws deploy push --application-name TechPact --s3-location s3://drupal-deployment-artifact-prod/$DIRECTORY-$BRANCH-$PREFIX.zip --source .
aws deploy create-deployment --application-name TechPact --s3-location bucket=drupal-deployment-artifact-prod,key=$DIRECTORY-$BRANCH-$PREFIX.zip,bundleType=zip --deployment-group-name $DIRECTORY-$BRANCH --file-exists-behavior OVERWRITE
Note the last two lines in the code, dynamically triggers the deployment group based on the env variables
Next, we need to create 3 types of deployment group for the Drupal CI CD with AWS and Gitlab tutorial:
- Dev, prod, and stage
- Give the deployment group a name with the environment name as the prefix
- And suffix in the name will be the name of the repository
So if we have 3 repositories (repo1 , repo2 , repo3 ) , we will have 9 deployment groups named as:
repo1-prod
repo1-dev
repo1-stage
repo2-prod
repo2-dev
repo2-stage
repo3-prod
repo3-dev
repo3-stage
Next we need to create 3 ec2 instances and install codedeploy agent on it , refer to aws docs for the same
The names of the instances should be also be kept as prod, dev, and stage
Next, we proceed to add targets to the deployment groups ensuring that the target name matches the prefix of the respective deployment group.
For eg:
repo1-prod
repo2-prod
repo3-prod
Will be having ec2 named “prod” as its target
The last and final step here is to add the appspec file in the root of all the repositories
The appspec.yml file will be
version: 0.0
os: linux
files:
- source: /
destination: /var/www/html/caddrupal/web/config/tp-d9-config/
hooks:
AfterInstall:
- location: ci-scripts/config-afterinstall.sh
runas: admin
Where destination will be the folder where you want to place the contents of the repository , in the ec2 instance
Note : Destination will be different for all the three repositories
The ci-scripts/config-afterinstall.sh will run after the code has been deployed to the target location; this file basically runs some commands to install dependencies whenever a new deployment is made.
config-afterinstall.sh
cd /var/www/html/caddrupal/
composer install
cd /var/www/html/caddrupal/web
drush cr
Also note that this file will have different commands depending on the repo contents. The above example is for code folder of Drupal.
With this, the Drupal CI CD with AWS and Gitlab example is complete! Now that you know Gitlab CI CD with AWS tutorial, all you have to do is implement the same.
By following the steps outlined in this blog, you will have a setup for CI/CD for Drupal using GitLab and AWS. This setup is just a starting point, and there are many more options available to customize your workflow. The most important thing is to find the right combination of tools and services that works best for your project. With some practice and experience, you can easily customize and optimize your CI/CD setup to achieve the best results.

Software Development Agency Tips: Boost Revenue with New Platforms

Xcode 9 Custom Templates


