Getting Started on the journey of NEXT.js

Are you ready to jump on the Next.js bandwagon? Javascript frameworks are always popular for their speed and efficiency, cross-platform compatibility, and enriched community support. With Next.js becoming a buzzword, everyone wants to learn it. Everyone wants to know about getting started with Next.js which is great.
However, one mistake we tend to make while learning something new is learning a bit of everything at once. We’re also more easily confused about where to start and in what direction to continue. Are you one of those people who are thinking about beginning their Next.js learning journey?
If yes, then this Next.js tutorial is going to show you what you need to know before starting the learning journey.

Let’s start with knowing what is Next.js.
Next.js is like a helpful toolbox for developers who want to build web apps using React. Next.js benefits in a huge way as it makes it super easy to create server-rendered React apps, which are faster to run. Plus, it does all the heavy lifting for you, like splitting up your code and automatically refreshing it when you make changes. It also makes it simple to create dynamic pages. In other words, Next.js makes it simple for developers to build fast and powerful web apps using React, by providing all the tools and features you need in one place. There are many Next.js benefits so it’s no surprise why it's a top pick for building web apps of all shapes and sizes.

Why Should You Invest your Time in Learning Next.js?
There are many Next.js benefits that can work wonderfully in your favor. Some of these include:
Server-side rendering: Next.js allows for server-side rendering of React components, which can improve the performance of your application. This is particularly important for SEO and for providing a better user experience on slower internet connections
Automatic code splitting: When getting started with Next.js, you also need to know that it automatically splits your code into smaller chunks, so that only the code needed for a specific page is loaded by the browser. This can help improve the load time of your application significantly.
Development experience: Next.js offers a wonderful development experience with features such as hot code reloading. This allows you to make changes to your code and see them reflected in the browser without having to manually refresh the page.
Dynamic Routing: Next.js makes it easy to create dynamic routes, which is useful when building web applications with dynamic content.
Popularity: Next.js is a popular framework for building web applications, with a growing community and ecosystem of plugins and tools.
Deployment: Next.js applications can be easily deployed to a variety of hosting platforms, including Vercel, which is a platform specifically optimized for Next.js.
How to Start a Next.js Project in Simple Steps:
To begin the Next.js installation process, we need to create a new Next.js project to start the journey of learning Next.js. Here are the steps that you need to follow.
Step1:
At first, we need to install node js if it’s not already installed on your device. We can easily install it from their official website.
Step 2:
We need to create a new folder for our project and navigate to it in our terminal and command prompt.
Step 3:
To set up our new Next.js project, we need to run the following command “npx create-next-app project-name” where “project name” will be the name of our project.
Step 4:
Once the installation is done, we need to navigate to our project folder using “cd project-name”.
Step 5:
To start the development server, run the following command in your terminal: “npm run dev”
Step 6:
Open the application in a browser: Open your browser and navigate to “http://localhost:3000” to view the application.

Understanding Next.js Pages:
Next.js pages are the building blocks of a Next.js application, representing the different routes in the application. Pages are typically stored in the “pages” directory at the root of your project.
Creating a page: To create a page in Next.js, you simply need to create a new file in the pages directory. For example, if you want to create a page at the route /about, you would create a file named about.js in the pages directory.
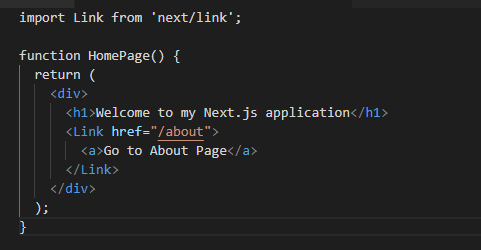
Navigating between pages: Next.js provides a built-in component called Link that you can use to navigate between pages. To use Link, simply import it from the next/link package and use it in your component like this:
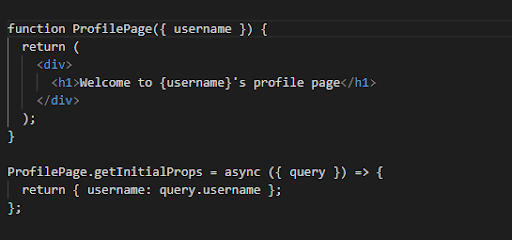
Dynamic routes: Next.js supports dynamic routes, allowing you to pass parameters to a page based on the URL. For example, if you want to create a page for a user's profile, you can create a dynamic route that takes the user's username as a parameter:
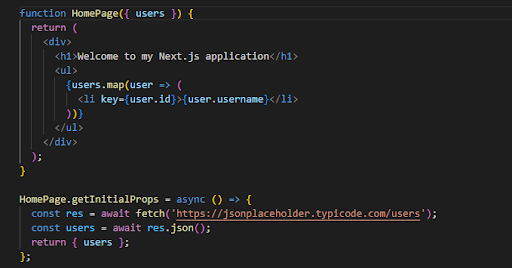
Page lifecycle methods: Next.js provides several lifecycle methods that you can use to control the behavior of a page. For example, you can use the getInitialProps method to fetch data from an API before the page is rendered, like this:
Server-side rendering:
Server-side rendering (SSR) is a technique used in web development to render a web page on the server before sending it to the client. With Server-side rendering frameworks, the HTML for a web page is generated on the server, rather than client-side JavaScript. This results in improved performance and faster load times, as the client doesn't need to wait for JavaScript to be executed and render the page. The benefit of server-side rendering doesn’t end here.
In a Next.js application, server-side rendering is automatically handled by the framework. When a client requests a page, Next.js will generate the HTML for that page on the server and send it to the client. This means that the page is already fully rendered when it arrives at the client, providing a fast and responsive user experience.
Routing:
Routing in Next.js refers to the process of mapping URLs to specific pages or components within a web application. It's a crucial part of any web application and helps users navigate through the application and access the content they are looking for.
In any Next.js tutorial, you will see, routing is handled automatically, and you can define routes using the file system structure. Each file in the pages directory of a Next.js project represents a separate route, and the filename determines the URL of that route. For example, a file named about.js in the pages directory would be accessible at the URL /about.
Code splitting:
Code splitting is an optimization technique in web development that helps to improve the loading time of web pages by breaking down large applications into smaller, more manageable chunks. This allows the browser to load only the necessary components of an application, rather than loading everything at once.
In Next.js, code splitting is handled automatically, meaning that developers don't have to worry about manually splitting their code. This results in faster loading times and improved performance, as the browser only has to download the components that are actually needed for the current view.
Code splitting is especially important for large, complex applications, as it helps to reduce the amount of code that needs to be loaded, which in turn speeds up the loading time and provides a better user experience. By mentioning code splitting in your Next.js tutorial, you can highlight the importance of performance optimization and show how Next.js makes it easy to achieve this goal.
Easy deployment:
Easy deployment is a key feature of Next.js that makes it simple to get your web applications up and running in a production environment. The streamlined deployment process in Next.js allows developers to focus on writing code, rather than worrying about the technical details of deploying their applications.
With Next.js, you have several options for deployment, including Zeit Now, Heroku, and AWS. Each platform provides its own set of benefits and trade-offs, making it easy to find a deployment solution that meets your specific needs.
Additionally, Next.js provides built-in support for common deployment tasks, such as handling environment variables and setting up custom domains. This makes it simple to get your application up and running with minimal hassle.
In conclusion, Next.js is a powerful and versatile framework for building modern web applications. Whether you are a beginner or an experienced developer, Next.js has something to offer. Its intuitive syntax and focus on performance optimization make it easy to get started, while its wide range of advanced features provides ample room for growth and experimentation.
So, if you are looking for a framework that can help you build web applications with confidence, Next.js is definitely worth considering. With its growing community, comprehensive documentation, and robust feature set, it has everything you need to build your next great web application. Get in touch with our experts to know how you can harness the power of Next.js and create web experiences that truly stun!

Case Study: TalentResources

7 Reasons Why CRM is Useful for Accountants
