Make Debugging Easy: Master the Art of React Unit Testing

Picture this: you've been working tirelessly on your latest coding project, pouring your heart and soul into every line of code. You're feeling pretty good about your progress until you make a small change, and suddenly everything comes crashing down. Your project is broken, and you have no idea what went wrong. Sound familiar?
Well, I suppose that everyone has experienced this at some point. But that's where and why testing is so imperative. In this blog, we will look at the importance of testing our code, React unit testing with Jest, and the essentials you need to know about React unit testing with Jest and React testing library.
Why is Testing Crucial?
The importance of testing our code is all about the peace of mind we achieve knowing our code works soundly and seamlessly. It ensures that it works properly, avoiding bugs and hours of debugging. Why is testing crucial is because it gives us the confidence to make changes and refactor our code without worrying if our application will still work as intended. So don't let your coding dreams be shattered by a simple error. Embrace the power of testing and code on with confidence!
The Process of Unit Testing: What to Know!
When it comes to ensuring the quality and reliability of our software, unit testing is a must. The process of unit testing involves breaking down our code into its smallest possible pieces and testing each component or function in isolation to verify that it produces the expected output for a given input.
Why unit test? So that by running these tests, we can identify any flaws or bugs in our software and make sure it meets the actual requirements we've set out to achieve.
However, before we dive into how unit testing is done, it's important to be familiar with two key tools:
- Jest
- React Testing Library
By mastering React unit testing with Jest and React testing library, we can streamline our testing process and gain a deeper understanding of our code's behavior. So, let's get ready to put our code to the test and ensure it's performing at its best!
What is Jest Javascript?
Jest is a highly versatile and widely used JavaScript framework that plays a critical role in our testing strategy. It provides a range of powerful features, including the ability to run tests, check code coverage, and create mocks, making it an indispensable tool for any developer's toolkit.
For those who are new to Jest and are wondering what is Jest framework, we highly recommend taking some time to explore the official documentation (https://jestjs.io/) to gain a deeper understanding of its capabilities and how it can be leveraged to enhance the effectiveness and efficiency of our testing efforts. So, if you're looking to take your testing to the next level, be sure to check out Jest and see how it can help you achieve your goals.
React Testing Library
When it comes to testing React applications, the React Testing library is a powerful tool at our disposal. Leveraging the @testing-library/react package, we can easily create tests that evaluate the behavior and functionality of our React components.
One of the key benefits of Jest in React testing library, especially as our testing framework is its framework-agnostic nature, which allows it to work seamlessly with a variety of different front-end frameworks. However, this also means that Jest does not inherently have the ability to handle React-specific functionality out-of-the-box.
This is where the importance of React Testing library comes into play, providing a set of utilities and APIs that make it easy to test React components in a way that is both intuitive and effective. By incorporating the React Testing library into our testing strategy, we can gain a deeper understanding of how our React components are functioning and ensure that our application is performing optimally.
Let's see an example ——
Now, let's take a look at a concrete Jest simple test example to illustrate the concepts of unit testing and how they relate to the Jest test framework.
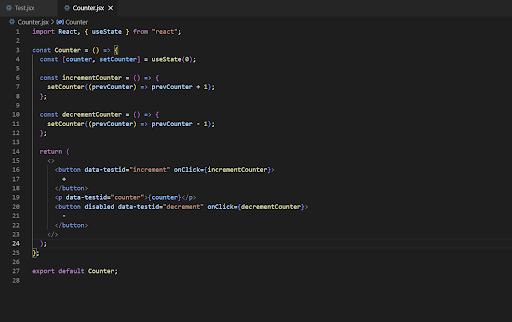
For the purposes of this unit test in the React example, we'll start with a simple counter component that uses two buttons to increment and decrement a numerical value. When performing unit tests in the React Testing library, this straightforward implementation serves as an accessible starting point for beginners to grasp the principles of unit testing and get a sense of how Jest operates more broadly.
1. Create a component:
How to unit test React components: To begin, we'll need to create the component itself and establish a testing framework that can verify its functionality. By following these steps and building upon them, we can become more confident and proficient in our ability to test and refine our code over time.

2. Let's write a unit test for this counter component:
Now, let's create a unit test for the counter component. But before diving into the details of testing, it's important to understand the basic structure of a test block.
Typically, a test is written as a test block.
- The component that we wish to test is initially rendered inside the test block.
- Choose the components we wish to engage with.
- Engage those components.
- Declare that the outcomes are as expected.
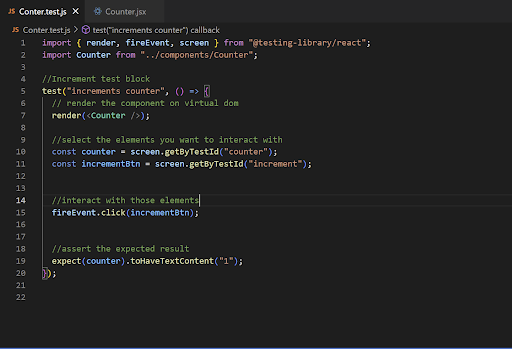
3. To create a unit test for the incrementing counter component, you can follow the code snippet below:

- To create a test block, you can use the test() function that takes two parameters.
- The first parameter should be the name of the test, such as "increments counter."
- The second parameter is a callback function where you write the actual test.
- Use the render() method from the React Testing library to render the Counter component in a virtual DOM.
- The render() method is a special function from @testing-library/react that renders the component in a virtual DOM.
- You can select the elements you want to test using the screen property from @testing-library/react.
- To interact with the button, we can use the fireEvent method to dispatch an event on the button element that we pass as an argument. There are various types of events we can use, such as click, change, submit, blur, focus, and more.
- After simulating the button click event, we can assert that the counter element will have the expected value of "1".
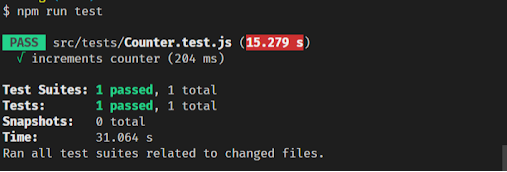
4: Run the test
To execute the test, simply run the following command. This test verifies that the loop term remains consistent throughout the lifecycle.
npm run test
Test Result :

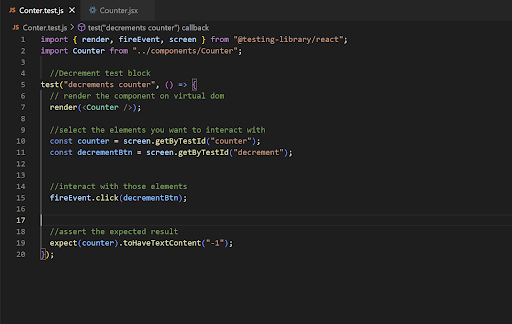
We can also test the decrement counter as well. If you’re wondering :

Conclusion:
Unit testing is a valuable technique to enhance the quality of your React apps by identifying bugs and defects in your code. By identifying and resolving issues early in the software development lifecycle (SDLC), the overall cost of development is reduced, and less time is spent on bug fixing during later stages of the project. React unit testing with Jest and React Testing library is a powerful approach that can help you achieve these goals.
This translates to higher customer satisfaction and a stronger reputation, ultimately attracting more reliable customers to your business.
So, if you want to improve the performance and reliability of your React apps and ensure they meet the highest standards of quality, then make unit testing an integral part of your development process. Your users will thank you for it!
Our team of experienced Front-End Developers are here to help! We can guide you on best practices, assist with specific projects, or just chat about all things React. So why not take advantage of our expertise and get in touch? Contact us today to learn more about our Front-End Development services and start taking your React projects to the next level!

Why Do We Debug Code?

Sjinnovation’s Project Management Process


