Usage of Cloud-formation Template
Looking to get rid of the need to manually create and manage resources, save time, and improve the reliability and scalability of your infrastructure? Then AWS CloudFormation Templates is a wise choice! In this blog post, we will discuss the benefits of using AWS CloudFormation Templates, and we will provide some examples of how you can use CloudFormation Templates to create and manage your infrastructure.
What is AWS CloudFormation Templates?
AWS CloudFormation is an Amazon Web Services AWS service that allows you to automate the deployment and management of AWS resources. The main benefit of using AWS CloudFormation? It enables you to provision and manage your resources consistently and repeatedly. This can save you time and effort, and help ensure that your resources are deployed in a consistent and secure manner.
- AWS CloudFormation uses templates to define the resources you want to create and configure.
- AWS CloudFormation Templates are written in JSON or YAML and describe the desired state of your resources.
- AWS CloudFormation Templates can include resources such as EC2 instances, load balancers, security groups, and more.
- You can also use AWS CloudFormation to create custom resources, which are resources that are not supported natively by AWS.
Example of how to use AWS CloudFormation to create an EC2 instance and a security group
Now, we will go over an example of how to use AWS CloudFormation to create an EC2 instance and a security group:
Getting started with AWS CloudFormation
To get started with AWS CloudFormation,
- Create a template: First create a template. You can do this using the AWS Management Console, AWS CLI, or any other tool that supports CloudFormation. For this example, we will use the AWS Management Console.
- Use AWS Management Console: Open the AWS Management Console and navigate to the CloudFormation service.
- Create Stack: Click the "Create Stack" button.
- Upload Template file: Select "Template is ready" and "Upload a template file" and click "Choose file".
- Pick a name for stack: Choose a name for your stack, such as "MyEC2Instance", and click "Next".
On the next page, you can specify any parameters that your template requires. For this example, we won't use any parameters, so you can click "Next" again.
- On the options page, you can specify any additional options for your stack. For this example, we won't use any options, so you can click "Next" again.
- Review your stack information and click "Create stack" to create your stack.
Creating an EC2 instance
Now that we have created our AWS CloudFormation stack, start adding resources to it!
To create an EC2 instance, you need to add a "AWS::EC2::Instance" resource to your template.
Here is an example of what the resource might look like:
YAML code example
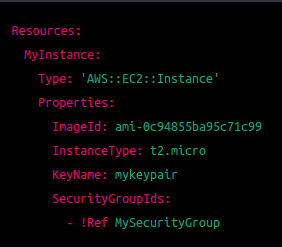
Let's break down what each line of this resource does:
- Resources: This is the top-level element of your AWS CloudFormation template and contains all the resources that you want to create.
- MyInstance: This is the logical ID of the EC2 instance resource. You can choose any name for this, as long as it is unique within your AWS CloudFormation stack.
- Type: This specifies the type of resource that you want to create. In this case, it is an EC2 instance.
- Properties: This is where you specify the properties of your resource. In this example, we are specifying the image ID, instance type, key pair name, and security group IDs for our instance.
- ImageId: This specifies the Amazon Machine Image (AMI) ID that you want to use for your instance. You can find a list of available AMIs in the AWS Management Console.
- InstanceType: This specifies the instance type that you want to use for your instance. The instance type determines the CPU, memory, and storage capacity of your instance.
- KeyName: This specifies the name of the key pair.
We will go over several examples of how to use CloudFormation templates to create and manage AWS resources.
Creating an S3 bucket
S3 is a storage service offered by AWS that allows you to store and retrieve objects such as files and documents. To create an S3 bucket using CloudFormation, you need to create an "AWS::S3::Bucket" resource in your template.
Here is an example of what the resource might look like:
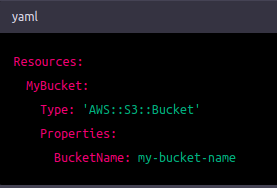
This creates an S3 bucket with the specified name.
Here's a breakdown of each line of the CloudFormation resource that creates an S3 bucket:
- Resources:: This keyword indicates that you are starting the section of the CloudFormation template that defines the resources you want to create.
- MyBucket:: This is the name you are giving to the S3 bucket resource. You can use any name you like, as long as it is unique within the CloudFormation stack you are creating.
- Type: 'AWS::S3::Bucket': This line specifies the type of resource you are creating. In this case, it is an S3 bucket resource.
- Properties:: This keyword indicates that you are starting the section of the resource that specifies its properties.
- BucketName: my-bucket-name: This line specifies the name of the bucket you want to create. In this case, it is "my-bucket-name". You can use any name you like, as long as it is unique within the S3 service.
So to summarize, this CloudFormation resource creates an S3 bucket with the name "my-bucket-name". The Type property specifies that it is an S3 bucket resource, and the BucketName property specifies the name of the bucket.
Creating an EC2 instance and attaching an EBS volume
EC2 is a service offered by AWS that allows you to create virtual machines in the cloud. EBS is a storage service offered by AWS that allows you to create persistent block storage volumes for your EC2 instances. To create an EC2 instance and attach an EBS volume using CloudFormation, you need to create an "AWS::EC2::Instance" resource and an "AWS::EC2::Volume" resource in your template.
Here is an example of what the resources might look like:
This creates an EC2 instance with the specified instance type, AMI, key pair, security group, and block device mapping. The block device mapping specifies that an EBS volume should be created and attached to the instance.
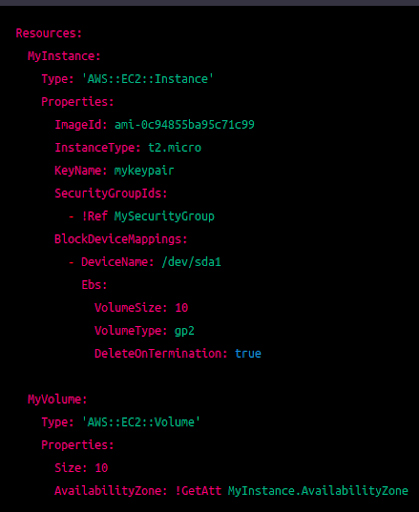
Here's a breakdown of each line of the CloudFormation resource that creates an EC2 instance and a volume:
- Resources:: This keyword indicates that you are starting the section of the CloudFormation template that defines the resources you want to create.
- MyInstance:: This is the name you are giving to the EC2 instance resource. You can use any name you like, as long as it is unique within the CloudFormation stack you are creating.
- Type: 'AWS::EC2::Instance': This line specifies the type of resource you are creating. In this case, it is an EC2 instance resource.
- Properties:: This keyword indicates that you are starting the section of the resource that specifies its properties.
- ImageId: ami-0c94855ba95c71c99: This line specifies the ID of the Amazon Machine Image (AMI) that the instance will use.
- InstanceType: t2.micro: This line specifies the instance type that you want to use for this EC2 instance. In this case, it is a t2.micro instance type.
- KeyName: mykeypair: This line specifies the name of the key pair that you want to use to connect to the EC2 instance.
- SecurityGroupIds:: This line specifies the security group IDs that you want to associate with the EC2 instance.
- !Ref MySecurityGroup: This is a CloudFormation function that retrieves the ID of the security group resource named "MySecurityGroup".
- BlockDeviceMappings:: This line specifies the block device mappings for the EC2 instance.
- DeviceName: /dev/sda1: This line specifies the device name of the block device that you want to attach to the instance.
- Ebs:: This keyword indicates that you are starting the section of the block device that specifies its EBS properties.
- VolumeSize: 10: This line specifies the size (in GB) of the EBS volume.
- VolumeType: gp2: This line specifies the type of the EBS volume.
- DeleteOnTermination: true: This line specifies whether the volume should be deleted when the instance is terminated.
- MyVolume:: This is the name you are giving to the EC2 volume resource. You can use any name you like, as long as it is unique within the CloudFormation stack you are creating.
- Type: 'AWS::EC2::Volume': This line specifies the type of resource you are creating. In this case, it is an EC2 volume resource.
- Properties:: This keyword indicates that you are starting the section of the resource that specifies its properties.
- Size: 10: This line specifies the size (in GB) of the volume.
- AvailabilityZone: !GetAtt MyInstance.AvailabilityZone: This line specifies the availability zone of the EC2 instance. The !GetAtt function retrieves the availability zone attribute of the `
Creating a VPC and its associated resources
A VPC is a virtual private cloud that allows you to create a logically isolated section of the AWS cloud. To create a VPC and its associated resources using CloudFormation, you need to create an "AWS::EC2::VPC" resource, an "AWS::EC2::InternetGateway" resource, an "AWS::EC2::VPCGatewayAttachment" resource, and an "AWS::EC2::Subnet" resource in your template.
Here is an example of what the resources might look like:
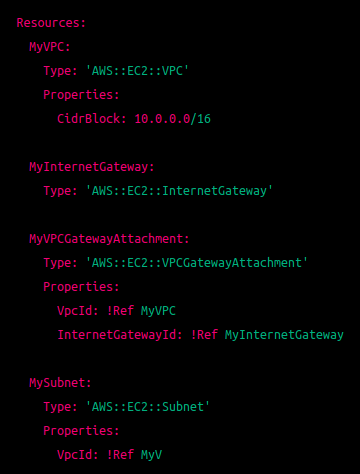
here's a breakdown of each line of this CloudFormation resource:
- Resources:: the start of the CloudFormation Resources section
- MyVPC: the name of the resource being created
- Type: 'AWS::EC2::VPC': the AWS resource type being created, in this case an EC2 Virtual Private Cloud (VPC)
- Properties:: the properties of the MyVPC resource
- CidrBlock: 10.0.0.0/16: the IP address range of the VPC being created
- MyInternetGateway: the name of the resource being created
- Type: 'AWS::EC2::InternetGateway': the AWS resource type being created, in this case an EC2 Internet Gateway
- MyVPCGatewayAttachment: the name of the resource being created
- Type: 'AWS::EC2::VPCGatewayAttachment': the AWS resource type being created, in this case an EC2 VPC Gateway Attachment
- Properties:: the properties of the MyVPCGatewayAttachment resource
- VpcId: !Ref MyVPC: the ID of the VPC to attach the Internet Gateway to, referenced from the MyVPC resource
- InternetGatewayId: !Ref MyInternetGateway: the ID of the Internet Gateway to attach to the VPC, referenced from the MyInternetGateway resource
- MySubnet: the name of the resource being created
- Type: 'AWS::EC2::Subnet': the AWS resource type being created, in this case an EC2 Subnet
- Properties:: the properties of the MySubnet resource
- VpcId: !Ref MyV: the ID of the VPC to create the subnet in, referenced from the MyVPC resource
Overall, this CloudFormation resource creates a VPC with an Internet Gateway attached and a subnet created in that VPC.
So there you have it! Everything you need to know about using AWS CloudFormation Templates and AWS CloudFormation benefits!
If you're still unsure about CloudFormation Templates, our AWS cloud consulting services experts can help! We offer template development, template review, template deployment, and template support, so you can rest assured that we manage all elements effectively!

Automated Testing – Top Reasons To Go For It

7 Rules to Follow and Stay Motivated at Work


